Talking to the Simulator #
This getting started tutorial builds off the hello world intro. It depends on iverilog, gtkwave, and cocotb being installed.
The tutorial will cover how to:
- drive a clock to your verilog module from cocotb
- write to signals in your HDL device under test (DUT)
- read signals in your HDL DUT
- write simple assertions in cocotb to check your DUT behaves as intended
Github Link #
Intro #
In the icarust tutorial we created a simple testbench to excercise our counter HDL. Lets create a similar testbench in cocotb. We will need to know some basics about assigning and reading values from the simulation.
Assigning Values in Cocotb #
Values can be assigned to signals using either the value property of a handle object or using direct assignment while traversing the hierarchy.
# to assign our clock signal to 1 we coul do this
dut.clk.value = 1

# or get the handle to the clock and pass that around like this
clk = dut.clk
clk.value = 1

# or use direct assignment through the hiearchy as follows:
dut.clk <= 1
note <= has nothing to do with verilog non-blocking assignments
Reading Values in Cocotb #
Reading values is just as straightforward. Accessing the value property of a handle object will return something cocotb calls a BinaryValue object - this is just a special class that has some helper functions (for more inof on BinaryValue see the types tutorial).
An important thing to note about BinaryValue’s is that any unresolved bits (Z, X, etc…) are preserved and can be accessed using the binstr attribute, or a resolved integer value can be accessed using the integer attribute.
That is too much to know for know, so to keep it simple just know tha to get a value all you need to do it
count = dut.count.value

# you can see the full binstr as follows
print(count.binstr)

# resolve the value to an integer - X or Z treated as 0!
print(count.integer)

# or show number of bits in a value
print(count.n_bits)
A Cocotb Testbench #
The below snippet creates a test, sets up a clock as a coroutine, toggles the reset signal and then runs a small assertion check over 50ns.
testbench.py #
# Simple tests for an counter module
import cocotb
from cocotb.clock import Clock
from cocotb.triggers import RisingEdge

@cocotb.test()
async def basic_count(dut):
    # generate a clock, started as a separate coroutine
    cocotb.start_soon(Clock(dut.clk, 1, units="ns").start())

    # Reset DUT
    dut.reset.value = 1

    # wait 2 rising edges until we release reset
    for _ in range(2):
        await RisingEdge(dut.clk)
    dut.reset.value = 0

    # run for 50ns checking count on each rising edge
    for cnt in range(50):
        await RisingEdge(dut.clk)
        v_count = dut.count.value
        mod_cnt = cnt % 16
        assert v_count.integer == mod_cnt, "counter result is incorrect: %s != %s" % (str(dut.count.value), mod_cnt)
Overview of the Testbench #
testbench.py runs sequentially, from start to finish. Each await expression suspends execution of the test until whatever event the test is waiting for occurs and the simulator returns control back to cocotb.
-
we brought in the clock class via
from cocotb.clock import Clock, which makes generating clock signals easy -
we brought in a trigger via
from cocotb.triggers import RisingEdgeto monitor rising edges of our simulation -
dut.<signal name>.valueis how we read and write signals in our design in cocotb. We drive the reset signal viadut.reset.valueand we read the output count viadut.count.value. -
@cocotb.test()is a python decorator. This one marks a function as a test. You can have multiple tests in a single file. -
cocotb.start_soon(Clock(dut.clk, 1, units="ns").start())is how we setup our clock to run as a separate coroutine. Don’t worry about the specifics of coroutines orstart_soonfor now. Just know we are driving the clock port via a separate coroutine baked into cocotb. -
async def basic_count- tests uses theasynckeyword. async functions can be scheduled to run concurrently andawaitfor other things to happen (giving control back to other processes) before continuing. -
At the end of the testbench we have a simple assertion denoted with
assertwhich is similar to SystemVerilog assertions. The one we wrote intestbench.pyjust checks that the output is what we expect. If a failure occurs, it will report it back to us.
Makefile for Counter Test #
As we saw in the hello world example, cocotb requires a makefile to do things like: tell cocotb where you verilog files are, which simulator you are using, and what your cocotb testbench is called. After setting up your make file running your testbench is as simple as typing make.
# Makefile

# defaults
SIM ?= icarus
TOPLEVEL_LANG ?= verilog

VERILOG_SOURCES = count_up.v

# use VHDL_SOURCES for VHDL files

# TOPLEVEL is the name of the toplevel module in your Verilog or VHDL file
TOPLEVEL = count_up

# MODULE is the basename of the Python test file
MODULE = testbench

# include cocotb's make rules to take care of the simulator setup
include $(shell cocotb-config --makefiles)/Makefile.sim
Running counter.v
#
type make wherever your makefile lives. After a short while your cocotb should run successfully.

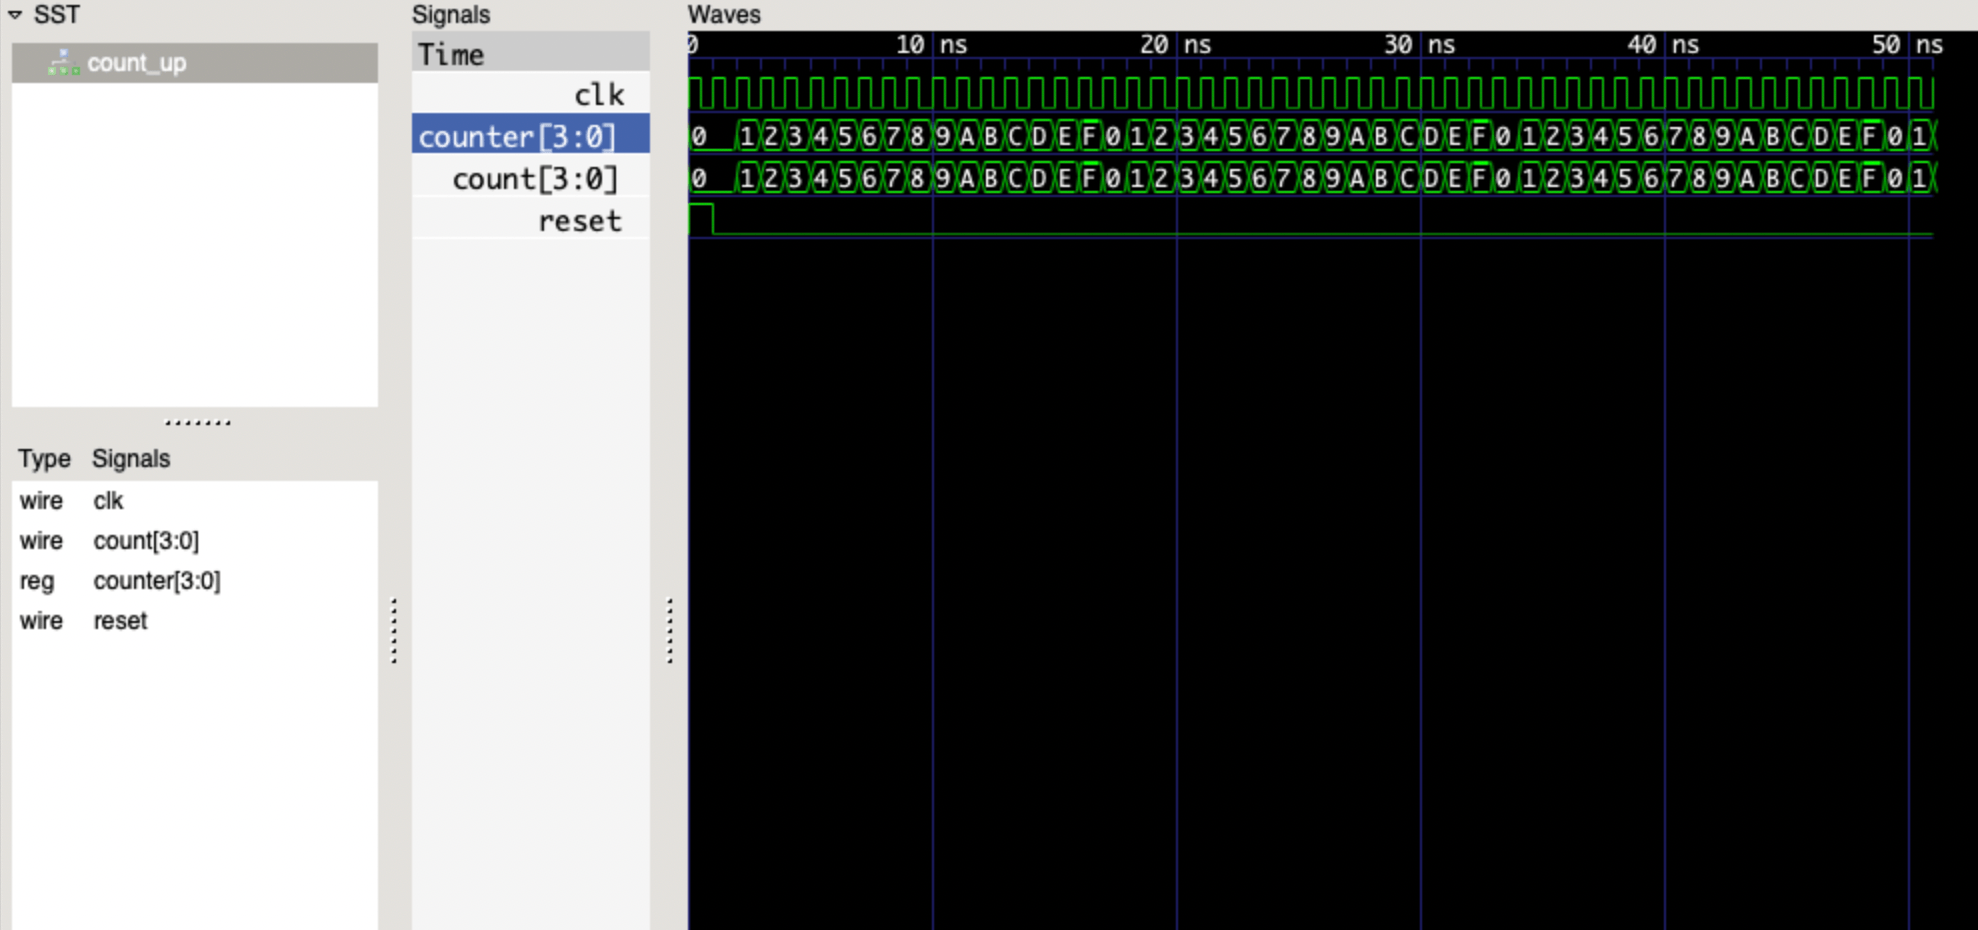
This simple example showcases some inner working of cocotb and our sequential processing of the testbench.
In the above waveform we see the clock runs for 52 ns, when our main test loop was set to run for 50 ns. Note the reset loop above our main testing loop ran for 2 periods before our testbench even started.
The order of events was as follows:
- we setup a clock to run as a coroutine (basically launching a separate
asyncfunction to run simultaneously to our test) - we set the reset port to high and proceeded to the first loop
- The await keyword halted our cocotb testbench, the simulator ran for a clock and then gave control back to the cocotb testbench where we once again awaited for the simulator to run for another period.
- Once it returned, our first loop (length 2) was over and we set the reset port to low
- we entered the second loop to run our actual test.
Dipping Our Toes in Cocotb Coroutines #
In testbench.py above, the simulation ran for 52 ns. We ran the testbench sequentially from start to end. What if we had put the reset routine in its own function and started it as a coroutine? Let’s investigate. In testbench2.py we break out the reset routine into its own async function. In the basic_count test we then start the clock AND the reset routine as coroutines using cocotb.start_soon. We turned the assertions off for now, we only want to view an interesting aspect of the output waveform.
testbench2.py #
# Simple tests for an counter module
import cocotb
from cocotb.clock import Clock
from cocotb.triggers import RisingEdge

async def run_reset_routine(dut):
    for _ in range(2):
        await RisingEdge(dut.clk)
    dut.reset.value = 0

@cocotb.test()
async def basic_count(dut):
    # generate a clock
    cocotb.start_soon(Clock(dut.clk, 1, units="ns").start())

    # Reset DUT
    dut.reset.value = 1

    # wait 2 rising edges until we release reset (concurrent, not sequential!)s
    cocotb.start_soon(run_reset_routine(dut))

    # run for 50ns checking count on each rising edge
    for cnt in range(50):
        await RisingEdge(dut.clk)
        v_count = dut.count.value
        mod_cnt = cnt % 16
        #assert v_count.integer == mod_cnt, "counter result is incorrect: %s != %s" % (str(dut.count.value), mod_cnt)
If we view the output waveform in gtkwave, the entire test now only runs 50 ns! The run_reset_routine does, in fact, run concurrently with the basic_test function.
